
pallet picture display with lights
Pallet Picture Display With Lights

Pallets are a versatile and inexpensive material that can be used for a variety of projects, including picture displays. With a little creativity and some basic tools, you can easily create a unique and stylish way to show off your favorite photos.


This tutorial will show you how to make a pallet picture display with lights. The finished project will be about 3 feet wide and 2 feet tall, and it will hold up to 10 photos.
Materials

- 1 pallet
- 1 sheet of plywood (1/2 inch thick)
- 2x4s (cut to size)
- Wood screws
- Wood glue
- Sandpaper
- Stain or paint (optional)
- LED lights (with battery pack)
- Wire cutters
- Electrical tape


Tools
- Saw
- Drill
- Sander
- Measuring tape
- Pencil
- Level
- Safety glasses

Instructions


- Cut the pallet. Use a saw to cut the pallet in half lengthwise.
- Assemble the frame. Cut two 2x4s to the same width as the pallet. Then, attach the 2x4s to the front and back of the pallet using wood screws.
- Add the plywood. Cut a piece of plywood to the same width and length as the pallet. Then, attach the plywood to the frame using wood screws.
- Sand the project. Use sandpaper to sand the project until it is smooth.
- Stain or paint the project. (Optional) If you want to add color to the project, you can stain or paint it.
- Add the lights. Cut a piece of wire to the length you need. Then, attach the lights to the wire using electrical tape. Finally, attach the wire to the back of the project using wood screws.
Tips

- Use a level to make sure the project is level before you attach the plywood.
- Pre-drill holes for the wood screws to prevent the wood from splitting.
- Use a saw guide to make straight cuts.
- Wear safety glasses when using power tools.


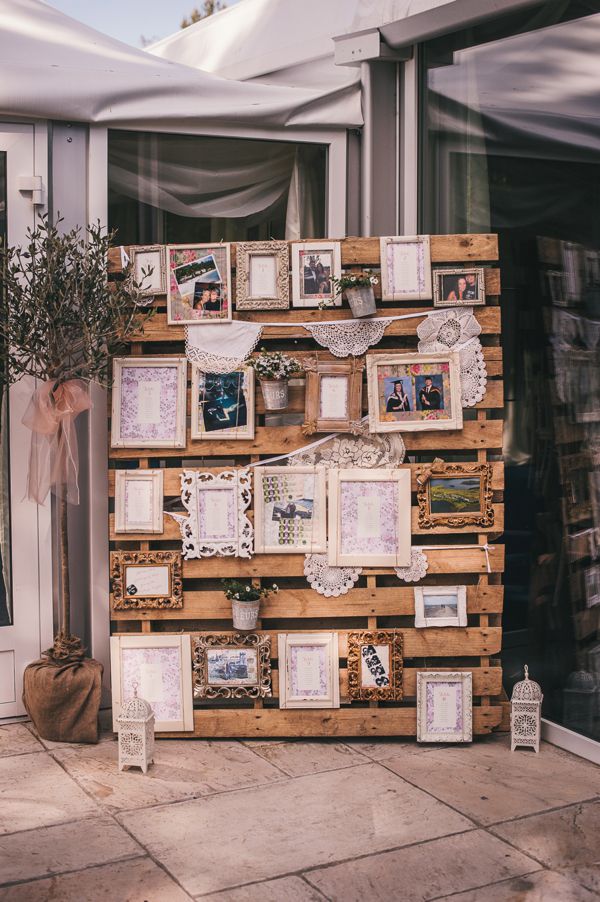
Final product
The finished project will be a beautiful and unique way to display your favorite photos. It's perfect for a living room, bedroom, or office.

Here are some additional tips for making a pallet picture display with lights:


- Use different size photos to create a more interesting display.
- Add a variety of frames to the display to mix up the look.
- Use lights in different colors to create a fun and festive display.
- Hang the display on a wall or place it on a table to show off your photos.
Pallet Picture Display with Lights


Pallets are a versatile material that can be used for a variety of projects, including picture displays. With a few simple materials and tools, you can create a beautiful and unique display for your photos or artwork.

Materials and Tools
- Pallet (1)
- Wood screws (1 box)
- Wood glue (1 bottle)
- Sandpaper (1 sheet)
- Stain or paint (optional)
- LED lights (1 set)
- Power cord (1)
- Wire cutters (1 pair)
- Electrical tape (1 roll)

Instructions

- Assemble the pallet. If your pallet is not already assembled, follow the instructions on the manufacturer's website or packaging.
- Sand the pallet. Use sandpaper to smooth out any rough edges on the pallet.
- Stain or paint the pallet. (Optional) If you want to add a pop of color to your pallet, you can stain or paint it. Allow the stain or paint to dry completely before continuing.
- Attach the LED lights. Cut the LED lights to the desired length. Then, attach the lights to the back of the pallet using hot glue or electrical tape.
- Plug in the lights. Once the lights are attached, plug them into an outlet.
- Add your photos or artwork. Once the lights are in place, you can add your photos or artwork to the pallet. You can use photo clips, adhesives, or simply prop your photos up against the pallet.
Tips

- Use a variety of sizes and shapes of photos or artwork to create a visually interesting display.
- If you want to add a personal touch, you can write messages or draw on your photos or artwork.
- You can also use the pallet picture display to store your photos or artwork. Simply stack your photos or artwork on top of each other and then place the pallet in a closet or other storage space.

Variations
You can easily customize this project to fit your needs and preferences. Here are a few variations to consider:


- Use a different type of wood for the pallet. For example, you could use a cedar pallet, a pine pallet, or a reclaimed wood pallet.
- Use a different color stain or paint for the pallet. You could choose a neutral color, such as white or gray, or you could go for a more vibrant color, such as blue or red.
- Add additional decorations to the pallet. For example, you could add flowers, ribbons, or other embellishments.
- Use the pallet picture display in a different location. You could place it on a coffee table, a bookshelf, or a mantel.

With a little creativity and imagination, you can transform a simple pallet into a beautiful and functional picture display. So what are you waiting for? Get started on your own project today!
Resources
