
Build Your Dream Potting Bench: Free Plans!
Build Your Dream Potting Bench: Free Plans!
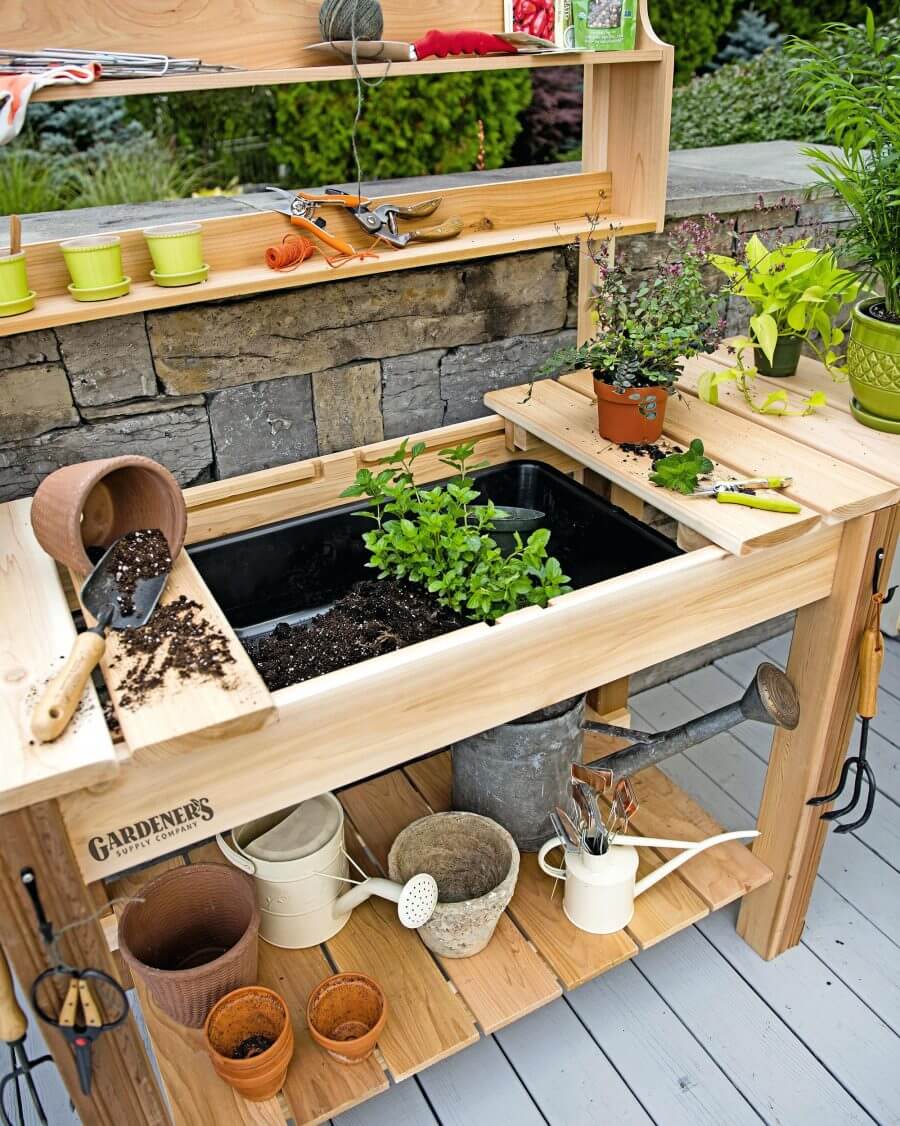
Gardening is a rewarding hobby, but it can be surprisingly demanding on your back and your workspace. Fumbling with pots, tools, and soil while kneeling or bending over can quickly turn a joyful activity into a frustrating chore. That's where a potting bench comes in. A well-designed potting bench is the gardener's best friend, providing a comfortable, organized, and efficient workspace to nurture your plants. This comprehensive guide will walk you through designing, building, and customizing your own dream potting bench using free, readily available plans. We'll explore various designs, material choices, and essential features to help you create the perfect addition to your garden.
Part 1: Planning Your Potting Bench
Before you even pick up a saw, careful planning is crucial. Consider these key factors:
-
Location: Where will your potting bench reside? Will it be against a wall, in a corner, or freestanding? Consider sunlight, access to water, and proximity to your garden beds. A sheltered location is preferable to protect your tools and supplies from the elements.
-
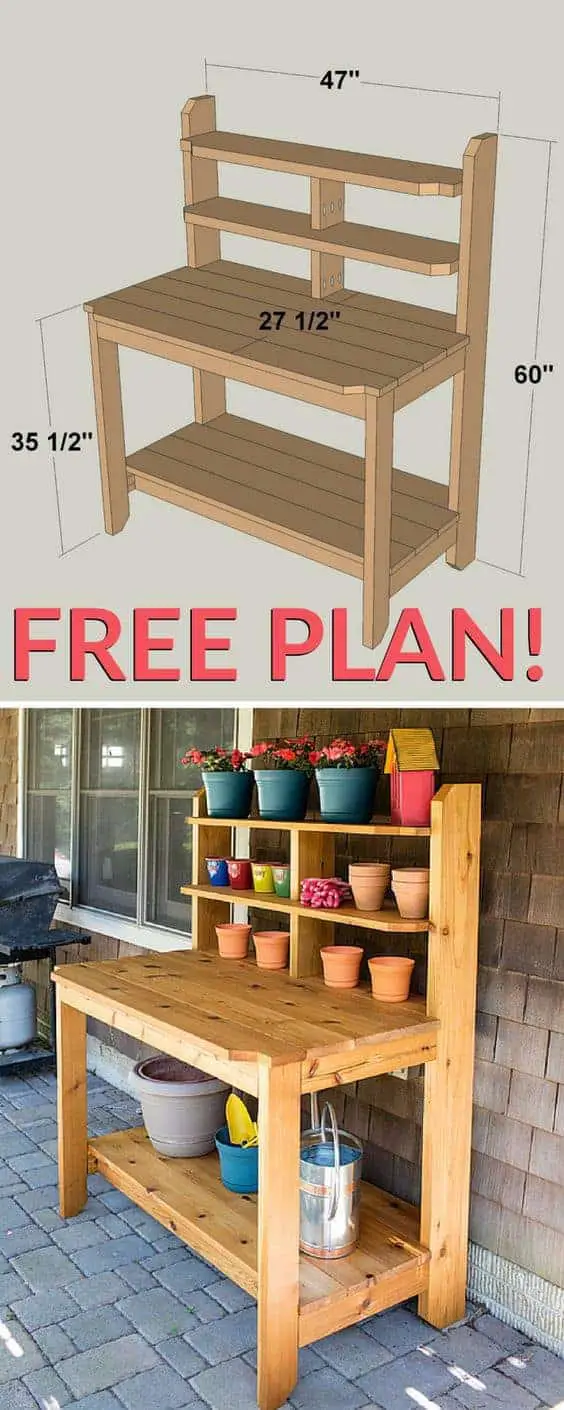
Size and Dimensions: How much space do you have available? How much space do you need? Consider the size of your pots, tools, and other gardening supplies. A larger bench offers more workspace but might require more materials and space. Free plans often offer customizable dimensions, allowing you to adapt the design to your specific needs.

-
Style and Design: Do you prefer a simple, rustic design or something more ornate and elaborate? There's a wide range of styles available, from sleek modern benches to charming farmhouse-style benches. Consider your existing garden aesthetic and choose a design that complements it. Browse online resources for potting bench plans to find inspiration and identify features you want to incorporate.
-
Material Selection: The choice of material significantly impacts the bench's durability, cost, and aesthetic. Common materials include:
- Pressure-treated lumber: Durable, weather-resistant, and relatively inexpensive, making it a popular choice for outdoor projects. However, it can contain chemicals, so consider using it with caution.
- Cedar or Redwood: Naturally resistant to rot and decay, these woods are attractive and long-lasting but more expensive than pressure-treated lumber.
- Reclaimed wood: Offers a unique rustic charm and environmentally friendly option. However, sourcing and working with reclaimed wood requires more effort.
- Metal: Durable and weather-resistant, metal benches offer a modern aesthetic. However, they can be more expensive and require specific tools for construction.
-
Essential Features: Think about the features you'd find most useful:
- Storage: Ample storage space for pots, tools, seeds, and fertilizers is a must. Consider adding drawers, shelves, or cabinets.
- Work Surface: Ensure the work surface is large enough to comfortably accommodate your tasks. A smooth, level surface is essential.
- Watering System: Incorporating a built-in watering system can simplify watering tasks. This can be as simple as a nearby hose bib or a more integrated system with a faucet and drainage.
- Lighting: Consider adding lighting if you frequently work in the evening. Solar-powered lights or a nearby outdoor outlet are options.
- Ergonomics: Design the bench height to ensure comfortable posture while working. Consider adjusting the height to your own needs.
Part 2: Choosing and Adapting Free Plans

The internet is a treasure trove of free potting bench plans. Numerous websites and blogs offer detailed blueprints, diagrams, and instructions for various designs. When choosing a plan, consider:
- Complexity: Choose a plan that matches your woodworking skills. Beginner-friendly plans are readily available, while more experienced builders can tackle more complex designs.
- Detailed Instructions: Look for plans with clear, step-by-step instructions, accompanied by diagrams and photos.
- Material List: A comprehensive material list is crucial to ensure you have everything you need before starting.
- Reviews and Feedback: Check for reviews and feedback from other users who have built the bench. This can provide valuable insights and help you avoid potential problems.
Once you've selected a plan, you may need to adapt it to your specific needs and preferences. This might involve adjusting the dimensions, adding or removing features, or substituting materials. Careful planning and modification are key to creating a perfectly tailored potting bench.

Part 3: Gathering Tools and Materials
Before you start building, gather all necessary tools and materials. This list is a general guide, and specific requirements will vary based on your chosen plan:
Tools:

- Measuring tape: For accurate measurements.
- Saw (circular saw or hand saw): For cutting lumber.
- Drill: For drilling pilot holes and assembling parts.
- Screwdriver (or drill with screwdriver bits): For fastening screws.
- Level: To ensure the bench is level.
- Safety glasses and hearing protection: Essential for safe woodworking practices.
- Clamps: To hold pieces together during assembly.
- Sandpaper: For smoothing surfaces and edges.
- Wood glue: For added strength and durability.
Materials (example for a simple design):
- Lumber: Based on the chosen plan's specifications (e.g., pressure-treated pine 2x4s and 2x6s).
- Screws: Exterior-grade screws suitable for your chosen lumber.
- Wood stain or paint (optional): To protect and enhance the appearance of the bench.
- Hardware (hinges, drawer slides, etc.): If incorporating drawers or other features.
- Fasteners: For securing shelves and other components.
Part 4: Building Your Potting Bench – Step-by-Step (General Guide)
This section provides a general guideline. Always refer to your chosen potting bench plans for specific instructions.
- Cut the Lumber: Accurately cut the lumber according to the plan's specifications. Double-check your measurements to avoid mistakes.

-
Assemble the Frame: Construct the main frame of the bench, typically using 2x4s or similar lumber. Use wood glue and screws for strong joints. Ensure the frame is square and level.
-
Add the Work Surface: Attach the work surface (usually 2x6s or thicker lumber) to the frame. Ensure the surface is level and sturdy.
-
Incorporate Storage: If your plan includes shelves, drawers, or cabinets, assemble and install these components now. Use appropriate hardware and ensure proper alignment.

-
Finishing Touches: Sand all surfaces smooth, and apply wood stain or paint if desired. Allow sufficient drying time before use.
-
Placement and Use: Position your new potting bench in your chosen location and begin enjoying your new gardening workspace!
Part 5: Customization and Enhancements

Once you've built your basic potting bench, consider these customization options:
- Add a Backsplash: Protect the back of the bench from splashing water and soil.
- Incorporate a Hose Reel: Keep your hose neatly organized and readily accessible.
- Add Pegboard: Provide a convenient place to hang tools.
- Install a Built-in Tray: Create a dedicated area for storing small items.
- Add Wheels: Make your potting bench mobile for easy relocation.
- Integrate a Greenhouse Feature: Consider a small greenhouse on top to protect seedlings.
Conclusion

Building your own potting bench is a rewarding project that enhances your gardening experience. By carefully planning, selecting appropriate free plans, gathering the necessary tools and materials, and following the instructions diligently, you can create a custom-designed workspace that fits your needs and style. Remember to prioritize safety and enjoy the process! Happy gardening!
Build Your Dream Potting Bench: Free Plans!
Gardening is a rewarding hobby, connecting us with nature and providing fresh produce or beautiful blooms. But the process can be cumbersome without the right tools and workspace. A potting bench is the gardener's best friend, providing a dedicated and organized area for all your planting needs. This comprehensive guide will walk you through designing, building, and customizing your own dream potting bench using free plans, ensuring you have a functional and aesthetically pleasing addition to your garden.
I. Planning Your Perfect Potting Bench: Size, Style, and Features
Before diving into construction, careful planning is crucial. Consider these key factors:
A. Size and Space:
Measure the available space in your garden or yard carefully. Your potting bench should fit comfortably without obstructing walkways or other garden features. Consider the dimensions of your largest pots and tools; you'll need ample surface area for working comfortably. A common size is around 4 feet wide by 2 feet deep, but this is easily adjustable based on your needs. Taller benches (around 36-40 inches) are preferable for ergonomic reasons, minimizing back strain.
B. Style and Design:
Potting benches come in various styles, from rustic and simple to elegant and ornate. Consider your overall garden aesthetic. A rustic bench might complement a cottage garden, while a sleek, modern design would suit a contemporary landscape. Explore different styles online for inspiration, paying attention to features that enhance functionality and visual appeal. This could include:
- Open shelving: Provides storage for pots, tools, and gardening supplies.
- Closed cabinets: Offers concealed storage for less frequently used items.
- Drawers: Ideal for organizing small tools and seeds.
- Built-in hooks: Convenient for hanging tools and watering cans.
- A countertop: A sturdy and spacious work surface.
- Backsplash: Protects the bench from splashes and spills.
C. Materials:
Choosing the right materials is essential for durability and longevity. Common options include:
- Pressure-treated lumber: Resistant to rot and decay, ideal for outdoor use.
- Cedar: Naturally resistant to rot and insects, offers a beautiful aesthetic.
- Redwood: Similar properties to cedar, with a rich reddish hue.
- Reclaimed wood: Eco-friendly and adds character to the bench.
Consider the climate and your budget when making your selection. Pressure-treated lumber is often the most affordable and durable option for harsh weather conditions.
II. Free Potting Bench Plans: Finding the Perfect Design
Numerous free plans are available online, catering to various skill levels and preferences. A quick search on websites like Pinterest, Instructables, and Ana White will yield a plethora of options. When choosing a plan, consider the following:
- Detailed instructions: Ensure the plan includes clear, step-by-step instructions with diagrams and photos.
- Cut list: A comprehensive list of materials with their dimensions is crucial for accurate cutting and assembly.
- Skill level: Choose a plan appropriate for your woodworking experience. Beginner-friendly plans often utilize simpler joinery techniques.
- Aesthetics: Select a design that complements your garden style and personal preferences.
Don't hesitate to modify a plan to fit your specific needs and available materials. For example, you can adjust the dimensions, add or remove features, or substitute materials based on availability and cost.
III. Essential Tools and Materials
Before starting construction, gather all necessary tools and materials. This will ensure a smooth and efficient building process. The specific tools and materials will vary depending on the chosen plan, but here's a general list:
A. Tools:
- Measuring tape: Accurate measurements are crucial for precise cuts.
- Saw: A circular saw or miter saw is ideal for accurate cuts. A hand saw can be used for simpler designs.
- Drill: Necessary for drilling pilot holes and assembling the bench.
- Screwdriver: For fastening screws. A cordless drill with a driver bit is highly recommended.
- Level: Ensures the bench is perfectly level and stable.
- Safety glasses: Protect your eyes from flying debris.
- Work gloves: Protect your hands from splinters and injuries.
- Clamps: Hold pieces together securely during assembly.
- Pencil: For marking cuts and assembly points.
- Sandpaper: For smoothing rough edges and surfaces.
B. Materials (will vary depending on chosen plan):
- Lumber: Choose your preferred type and quantity based on your chosen plan.
- Screws: Exterior-grade screws are recommended for durability.
- Wood glue: Enhances the strength and stability of the joints.
- Exterior wood sealant or paint: Protects the wood from the elements and adds aesthetic appeal. Consider a water-based sealant for a more environmentally friendly option.
- Optional: Hardware for drawers, cabinets, or other features.
IV. Step-by-Step Construction Guide (General Overview)
This section provides a general overview of the construction process. Refer to your chosen plan for detailed, specific instructions.
A. Cutting the Lumber:
Accurately cut all lumber pieces according to your plan's cut list. Use a saw guide or miter saw for precise cuts. Number each piece for easy identification during assembly.
B. Assembling the Frame:
Assemble the frame of the bench following the plan's instructions. Use wood glue and screws to create strong and durable joints. Ensure all joints are square and level. Clamps are essential for holding pieces together while the glue dries.
C. Attaching the Top:
Once the frame is assembled, attach the countertop. Ensure it is level and securely fastened.
D. Adding Shelving and other Features:
Install shelves, drawers, cabinets, or other features according to the plan. Use appropriate hardware and ensure everything is securely attached.
E. Finishing Touches:
Sand all surfaces smooth, removing any splinters or rough edges. Apply wood sealant or paint to protect the wood and enhance its appearance. Allow sufficient drying time before using the bench.
V. Customizing Your Potting Bench
Once you've built a basic bench using the free plans, consider these customization options:
- Adding a roof: Protect your plants and tools from the elements with a simple roof structure.
- Incorporating wheels: Makes the bench mobile and easy to move around the garden.
- Installing a built-in sink: Add a convenient water source for watering plants.
- Adding a chalkboard or whiteboard: A perfect place to jot down gardening notes or plant lists.
- Building integrated storage for seed packets: Keep your seeds organized and easily accessible.
VI. Maintenance and Care
Proper maintenance will ensure your potting bench lasts for years to come. Regularly inspect the bench for any signs of damage or wear and tear. Re-apply sealant or paint as needed to protect the wood from the elements. Clean the bench regularly to remove dirt and debris.
By following these steps and customizing to your needs, you'll create a functional and beautiful potting bench that will enhance your gardening experience for years to come. Remember to always prioritize safety and use appropriate safety gear while building. Happy gardening!


