
Pallet Potting Bench: DIY Garden Bliss!
Pallet Potting Bench: DIY Garden Bliss!
Transforming discarded pallets into a functional and stylish potting bench is a rewarding DIY project that blends practicality with eco-consciousness. This guide will walk you through the entire process, from sourcing materials to the final touches, ensuring you create a beautiful and sturdy potting bench perfect for your garden oasis. This isn't just about building a bench; it's about creating a dedicated space for nurturing your green passions.
I. Planning and Preparation: Laying the Foundation for Success
Before you even touch a hammer, meticulous planning is crucial for a successful project. This phase involves several key steps:
A. Sourcing Your Pallets: The Heart of the Project
The foundation of your potting bench rests on the pallets themselves. Choosing the right ones is paramount. Look for pallets that are:
- Heat-treated: Avoid chemically treated pallets (marked with "HT" or "KD"). Chemically treated wood can release harmful substances into the soil, compromising your plants' health.
- Sturdy and intact: Inspect for rot, cracks, loose boards, and significant damage. A wobbly or unstable base will compromise the entire structure.
- Consistent dimensions: While variations are expected, aim for pallets with relatively uniform board spacing and overall dimensions for easier assembly. Measure your available space to determine the ideal pallet size for your potting bench. You'll likely need at least two, possibly three, depending on the desired length and width.
Once you have your pallets, thoroughly clean them. Use a stiff brush to remove dirt, debris, and any loose nails or staples. Consider using a pressure washer for a more thorough cleaning, ensuring you allow the wood to dry completely before proceeding.
B. Essential Tools and Materials: Gathering Your Arsenal
Building your potting bench requires a range of tools and materials. Having everything readily available will streamline the process and prevent frustrating interruptions:
- Measuring tape and pencil: Accurate measurements are the cornerstone of a well-built structure.
- Safety glasses and work gloves: Protecting yourself from injury is non-negotiable.
- Hammer and pry bar: For disassembling and reassembling pallet components.
- Circular saw or hand saw: For cutting pallet boards to size (if necessary).
- Screwdriver (Phillips and flathead): For securing the structure.
- Wood screws: Choose exterior-grade screws for durability and weather resistance. Consider using galvanized screws for extra protection against rust.
- Sandpaper: For smoothing rough edges and splinters.
- Wood stain or paint (optional): To personalize the aesthetic of your potting bench. Choose exterior-grade paint or stain for longevity and weather protection.
- Wood sealant (optional): To protect the wood from moisture damage and prolong its lifespan.
- Level: Ensuring the bench is perfectly level is crucial for stability and functionality.
- Clamps (optional): Useful for holding components in place during assembly.
C. Designing Your Potting Bench: Tailoring to Your Needs
Before jumping into construction, visualize your ideal potting bench. Consider the following:
- Dimensions: How much space do you have? How much potting space do you need? A smaller bench might suffice for a balcony garden, while a larger one is better suited for a spacious backyard.
- Height: Choose a height that’s comfortable for you to work at. Consider your own height and the ergonomics of potting and planting.
- Features: Do you need shelves for storage? Side hooks for tools? A built-in water trough? Planning these features in advance helps ensure a seamless integration into your design.
- Style: Do you prefer a rustic, natural look or a more refined, painted finish? This choice influences your material selection and finishing touches.
II. Construction: Bringing Your Vision to Life
With planning complete, it's time to assemble your pallet potting bench. This section breaks down the construction process into manageable steps:
A. Disassembling and Preparing the Pallets

Carefully disassemble the pallets. Use the pry bar to separate the boards and the hammer to remove any stubborn nails. Be mindful of splinters and take necessary safety precautions. Once disassembled, inspect each board for damage. Discard any severely damaged or warped boards.
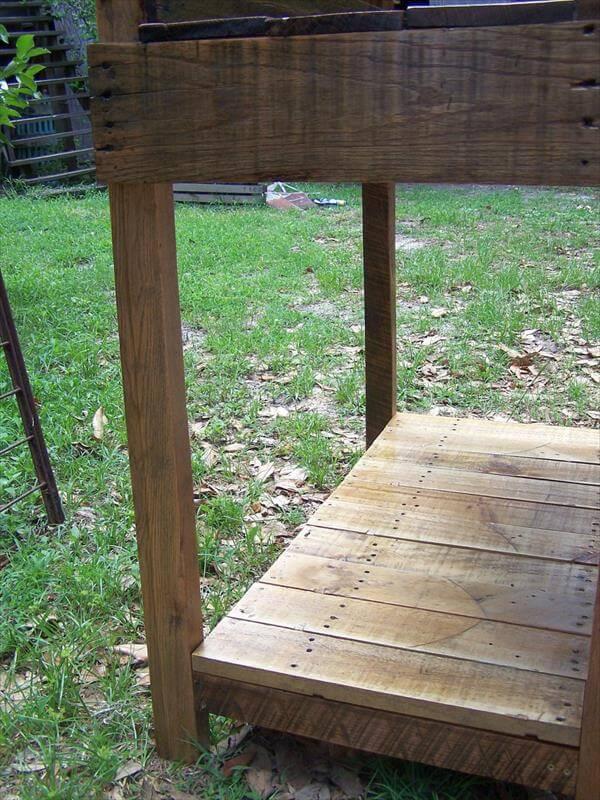
B. Building the Base: The Foundation of Stability
The base is the most crucial part of your potting bench. You can create a sturdy base using two or more pallets. There are a few options:
- Simple Base: Use two pallets side-by-side, securing them together using screws and wood glue for added strength.
- Elevated Base: If you desire additional storage or want to raise the workbench height, you can create a frame using additional pallet wood, building a sturdy rectangular box-like structure that supports the pallet top.
Ensure the base is level using a level and adjust as needed. Once the base is stable, secure it with additional screws.
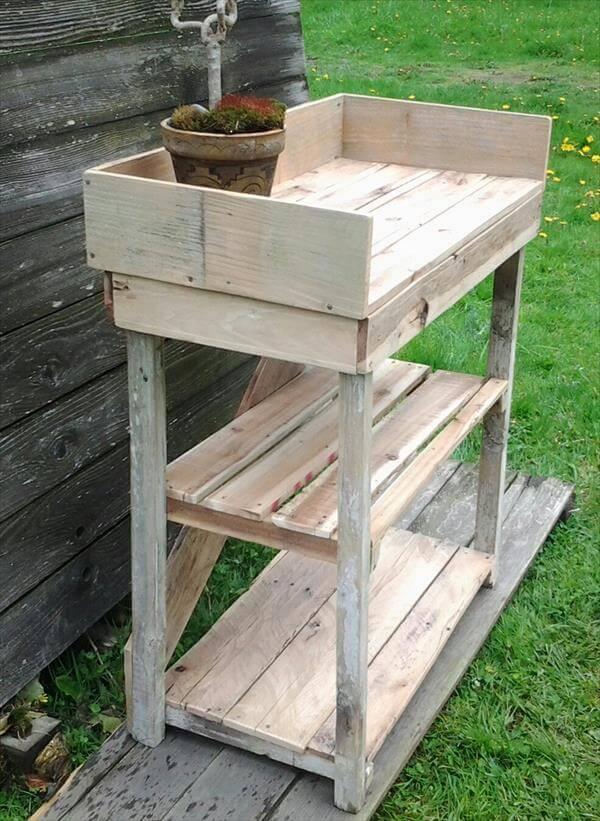
C. Constructing the Work Surface: The Heart of the Operation
The work surface can be constructed in several ways:
- Single Pallet Top: A single pallet can serve as a perfectly functional work surface. Ensure the pallet is securely attached to the base using screws.
- Double Pallet Top: For a wider work surface, combine two pallets. Ensure they are aligned correctly and securely fastened to the base.
- Custom Top: For a more customized look, you can create a new work surface from the disassembled pallet wood. Arrange the boards to your liking, creating a smooth and even surface.
Sand any rough edges to create a smooth and comfortable work surface.

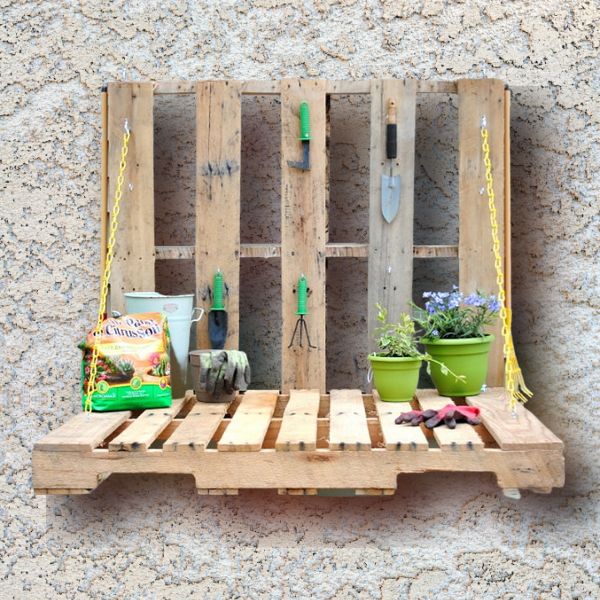
D. Adding Extra Features: Enhancing Functionality
Enhance your potting bench with practical features:
- Shelves: Add shelves underneath the work surface for storage using leftover pallet wood.
- Side Hooks: Attach hooks to the sides for hanging gardening tools.
- Water Trough: Integrate a small water trough for easy access to water while potting.
- Wheels (Optional): Attach wheels to the base for easy mobility.

III. Finishing Touches: Polishing Your Creation
Once the structure is complete, it's time to add those finishing touches that transform it from a simple structure into a beautiful and functional piece of garden furniture.
A. Sanding and Smoothing: Refining the Surface

Thoroughly sand all surfaces to remove splinters and create a smooth finish. Use different grits of sandpaper, starting with a coarser grit and finishing with a finer grit for a polished result.
B. Staining or Painting: Adding Personality and Protection
Apply a wood stain or paint to protect the wood from the elements and to personalize the look of your potting bench. Choose a weather-resistant stain or paint to ensure longevity. Allow sufficient drying time between coats.

C. Sealing: Protecting Your Investment
Apply a wood sealant to further protect the wood from moisture damage and to enhance its durability. This will prolong the life of your potting bench and keep it looking its best for years to come.
IV. Maintaining Your Pallet Potting Bench: Ensuring Longevity

With proper care, your pallet potting bench can serve you for many years. Regular maintenance is key:
- Regular Cleaning: Clean the bench periodically to remove dirt and debris. A damp cloth is usually sufficient.
- Protection from the Elements: If your bench is outdoors, consider covering it during harsh weather conditions like heavy rain or snow.
- Repairing Minor Damage: Address any minor damage promptly to prevent further deterioration. Tighten loose screws or replace damaged boards as needed.
V. Conclusion: Embrace the Joy of DIY Gardening
Creating a pallet potting bench is a rewarding experience that combines creativity, practicality, and sustainability. By following these steps, you can transform discarded materials into a beautiful and functional addition to your garden. Remember to prioritize safety throughout the process and enjoy the satisfaction of building something beautiful with your own hands. The result is more than just a potting bench; it's a testament to your DIY skills and a welcoming space where you can nurture your love for gardening. Happy potting!
Pallet Potting Bench: DIY Garden Bliss!
Transforming discarded pallets into a functional and aesthetically pleasing potting bench is a rewarding DIY project that combines sustainability with practicality. This comprehensive guide will walk you through the entire process, from sourcing materials and planning the design to the final assembly and finishing touches. Get ready to cultivate your own corner of garden paradise!
I. Sourcing and Preparing Your Pallets
The heart of this project lies in selecting the right pallets. Not all pallets are created equal, and choosing the right ones will significantly impact the final product's stability and longevity.
A. Choosing the Right Pallets:
- Material: Opt for heat-treated pallets (marked with an "HT" stamp). These are safer to work with and less likely to contain harmful pesticides or treatments. Avoid chemically treated pallets (marked with "MB" or "KD") unless you are confident in your ability to safely remove and neutralize any chemicals. This often requires professional cleaning and is not recommended for beginners.
- Condition: Inspect the pallets carefully. Look for straight boards, free from significant warping, rot, or insect infestation. Minor imperfections are acceptable, especially with rustic aesthetics in mind, but major structural damage should be avoided.
- Size: Consider the desired dimensions of your potting bench. Standard pallets are typically 48 inches long and 40 inches wide, but you can adjust the size of your bench by combining multiple pallets or cutting down individual boards.
- Source: Check local businesses, construction sites (with permission), or even online classifieds for free or inexpensive pallets. Remember to always obtain permission before taking pallets from private property or businesses.
B. Preparing the Pallets:
Once you have your pallets, it's crucial to prepare them for construction. This process involves cleaning, dismantling, and potentially repairing damaged sections.
- Cleaning: Thoroughly clean the pallets using a stiff brush, soapy water, and a pressure washer (if available). Remove any loose debris, dirt, or clinging materials. Allow the pallets to dry completely before proceeding.
- Dismantling: Carefully disassemble the pallets using a crowbar, hammer, and possibly a reciprocating saw. Wear safety glasses and gloves throughout this process. Take note of how the boards are arranged, as this will help with reassembly.
- Repairing: Replace or reinforce any damaged boards. You can use wood glue and screws to secure new boards or to strengthen existing ones. Consider using wood filler to repair any cracks or holes before sanding.
- Sanding: Sand all surfaces smooth using progressively finer grit sandpaper. This will remove splinters and create a smoother surface for painting or staining. Wear a dust mask to avoid inhaling wood dust.
II. Designing Your Potting Bench
The design of your potting bench is largely up to your preference and the dimensions of your pallets. However, some key considerations will ensure a sturdy and functional piece of garden furniture.
A. Height and Dimensions:
Consider the ergonomic aspects of your potting bench. A comfortable working height is crucial. A height of approximately 34-36 inches is generally recommended. The width and depth should be sufficient for your needs and the space available in your garden.
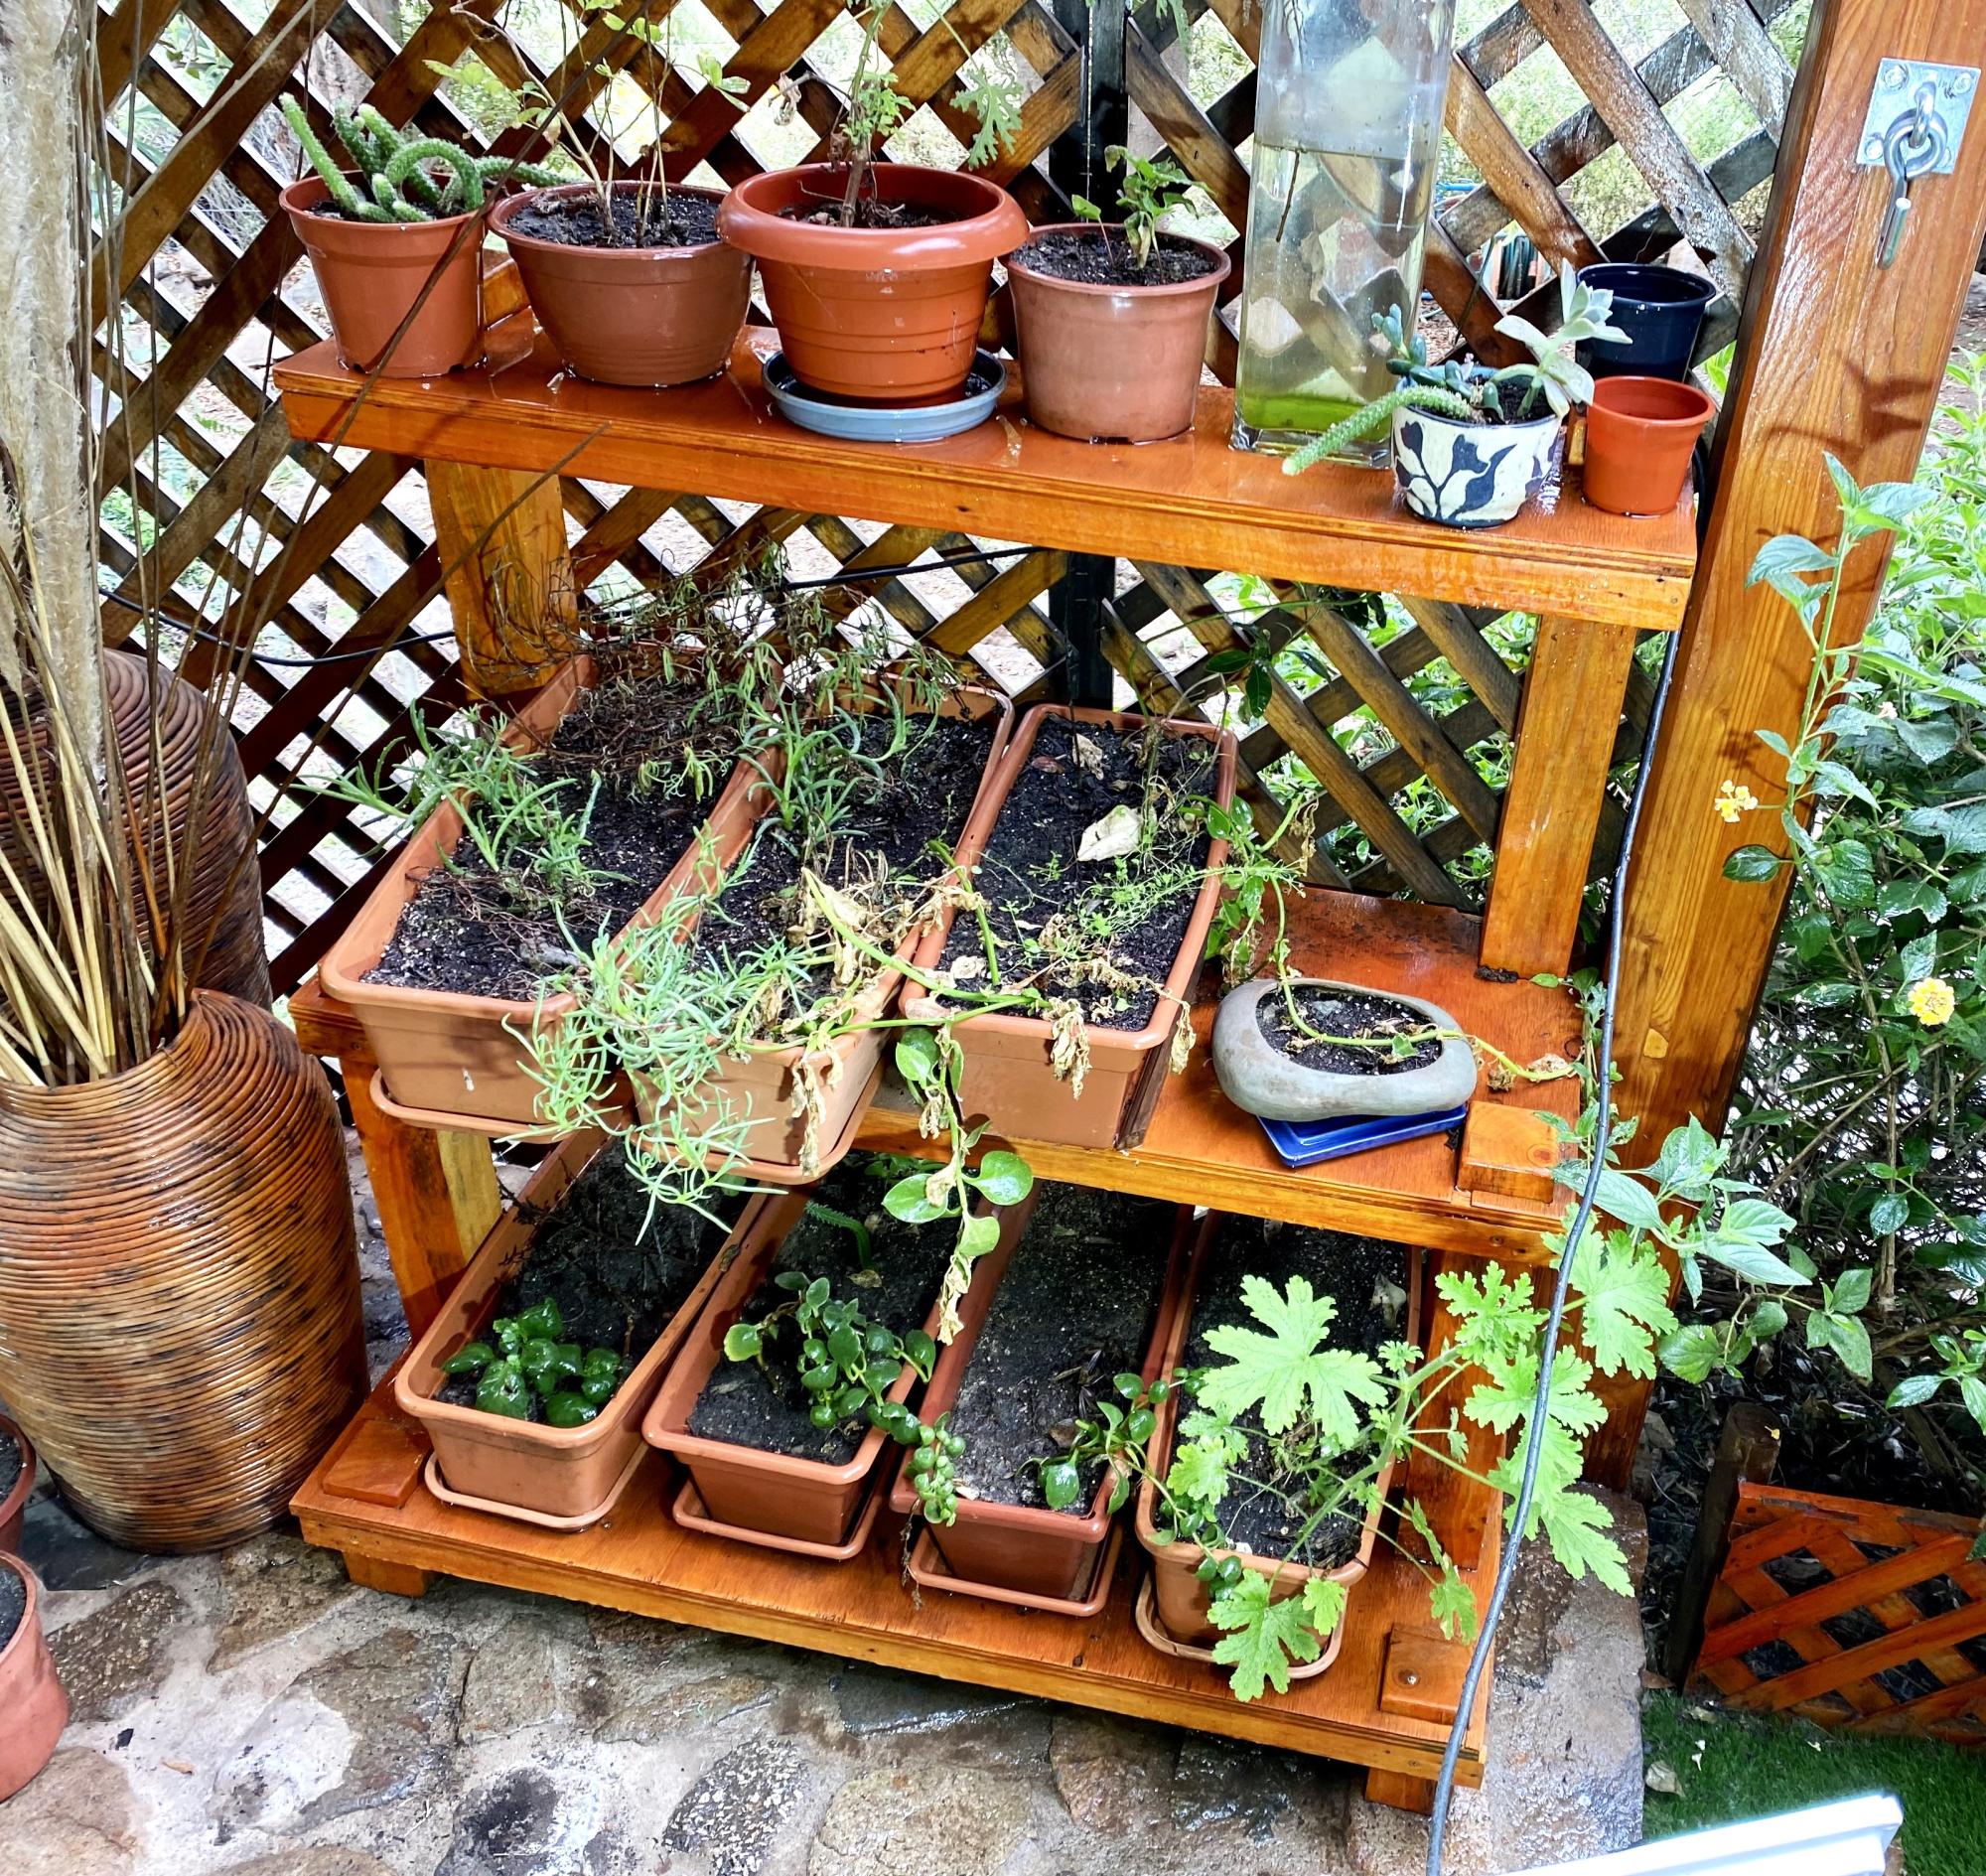
B. Features to Include:
- Shelves: Incorporating shelves provides extra storage space for potting supplies, tools, and seeds. Consider the placement and depth of shelves to maximize functionality.
- Drawers: Adding drawers can further enhance storage capabilities.
- Side Hooks: Hanging hooks on the sides can be used to store gardening tools, making them readily accessible.
- Work Surface: Ensure the work surface is level and spacious enough for comfortable potting.
C. Sketching Your Design:
Before starting the assembly, sketch out your design. This will help visualize the final product and ensure you have all the necessary materials. Include detailed dimensions and measurements to guide your construction.
III. Assembling Your Potting Bench
This section details the assembly process. Remember to always prioritize safety by wearing appropriate safety gear, including safety glasses and gloves.
A. Framework Construction:
The framework usually involves using the strongest pallet boards to create a sturdy base and support structure. This might involve cutting and joining boards to create a rectangular frame. Use wood screws and wood glue for strong and durable joints. Pre-drilling pilot holes will prevent the wood from splitting.
B. Attaching the Work Surface:
Once the framework is complete, attach the work surface. This is usually made from a solid, flat section of pallet wood or even a separate piece of plywood for a smoother surface. Ensure it's securely fastened to the frame.
C. Adding Shelves and Drawers (Optional):
If incorporating shelves and drawers, construct them separately and then attach them to the main frame. Consider using drawer slides for smooth operation. Ensure adequate support for shelves to prevent sagging.
D. Attaching Side Hooks (Optional):
Securely attach side hooks to the frame using appropriate screws.
IV. Finishing Touches and Protection
Once the assembly is complete, it’s time to add the finishing touches and protect your investment.
A. Sanding and Finishing:
Sand any rough edges or uneven surfaces. Apply a protective finish, such as paint, stain, or sealant. This will protect the wood from the elements and enhance its appearance. Consider using exterior-grade paint or sealant for outdoor use.
B. Painting or Staining:
Choose a colour scheme that complements your garden's aesthetic. Apply several thin coats of paint or stain, allowing each coat to dry completely before applying the next.
C. Sealing:
A sealant will further protect the wood from moisture and UV damage. This is especially important for outdoor potting benches.
D. Adding Personal Touches:
Consider adding personal touches like decorative knobs on drawers, or stenciling designs onto the work surface.
V. Maintenance and Care
To ensure the longevity of your pallet potting bench, regular maintenance is essential.
- Cleaning: Regularly clean the surface to remove dirt and debris.
- Inspection: Periodically inspect the bench for any signs of damage or wear and tear.
- Repairing: Address any damage promptly to prevent further deterioration.
- Protection: Reapply sealant or paint as needed to maintain protection from the elements.
Conclusion
Building a pallet potting bench is a rewarding and environmentally friendly DIY project. With careful planning, attention to detail, and a little creativity, you can create a beautiful and functional addition to your garden. This project allows you to upcycle discarded materials, saving money and reducing waste while simultaneously adding a unique and charming element to your outdoor space. Enjoy the process and the beauty of your handmade garden haven! Happy gardening!


