
Tiny Pond DIY: Big Impact!
Tiny Pond DIY: Big Impact!
Creating a tranquil oasis in your backyard doesn't require acres of space or a hefty budget. A tiny pond DIY project can transform even the smallest garden into a stunning focal point, teeming with life and radiating serenity. This comprehensive guide will walk you through the entire process, from initial planning and design to construction, planting, and ongoing maintenance, enabling you to build your own miniature aquatic paradise.
I. Planning and Design: Dreaming of Your Miniature Oasis
Before you even begin digging, meticulous planning is crucial for a successful tiny pond DIY project. Consider these key aspects:
A. Location, Location, Location:
The placement of your pond significantly impacts its success and aesthetic appeal. Choose a spot that receives at least some sunlight (ideally 4-6 hours a day) but also offers some shade during the hottest parts of the day to prevent excessive algae growth. Consider the following:
- Accessibility: Will you need easy access for maintenance tasks like cleaning and planting?
- Aesthetics: How will the pond integrate with your existing landscape? Think about pathways, surrounding plants, and overall garden design.
- Utilities: Ensure the chosen location is far enough from underground utilities (pipes, cables) to avoid accidental damage during excavation.
- Drainage: Observe the area after rainfall to ensure there's no significant water runoff that could impact your pond's water level.
B. Size and Shape:
The beauty of a tiny pond DIY project is its flexibility. You can create a pond of almost any size and shape to fit your space and preferences. Popular choices include:
- Circular ponds: These offer a classic, elegant look and are relatively easy to construct.
- Kidney-shaped ponds: These mimic natural water bodies and provide a more organic feel.
- Square or rectangular ponds: These offer a more structured, contemporary look and can fit neatly into smaller spaces.
Consider the available space and the overall scale of your garden when choosing the size. A tiny pond can be as small as 2-3 feet in diameter, but larger designs (up to 6 feet) offer more possibilities for aquatic plants and wildlife.
C. Style and Theme:
Once you've decided on the size and shape, consider the overall style and theme of your pond. Will it be a formal, structured design, or a more naturalistic, informal creation? Will it complement existing features in your garden, or will it be a unique statement piece? These decisions will guide your choices regarding materials, plants, and overall design.
II. Materials and Tools: Gathering Your Arsenal
Having the right tools and materials on hand is essential for a smooth and efficient tiny pond DIY process. Here's a list of essential items:
- Spade and shovel: For digging and moving soil.
- Measuring tape and string: For precise measurements and marking out the pond's perimeter.
- Level: To ensure a level base for your pond.
- Pond liner: This is a crucial component, available in various materials (butylene, EPDM rubber) and sizes. Choose a liner that's slightly larger than your planned pond dimensions to allow for overlap and secure fitting.
- Underlayment (optional): This protects the liner from sharp objects in the soil. Consider using landscape fabric.
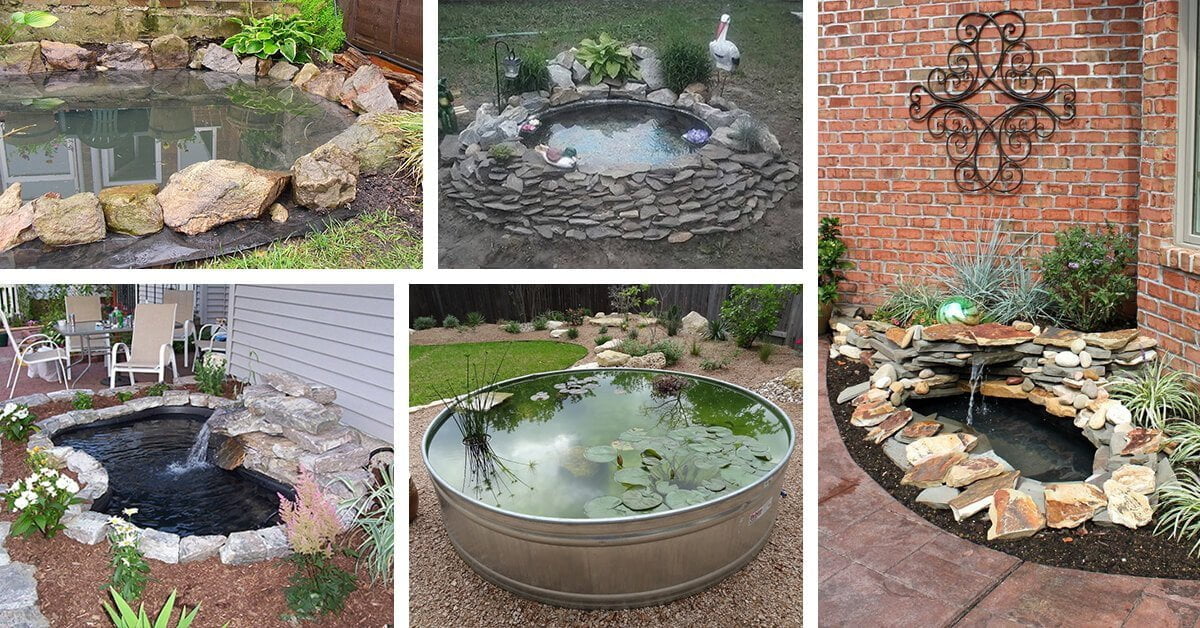
- Rocks, stones, and gravel: For creating a natural edge and landscaping around the pond.
- Aquatic plants: Choose plants suited to the size of your pond and the amount of sunlight it receives.
- Water pump (optional): For creating a water feature such as a small fountain or waterfall.
- Filter (optional): For maintaining water quality, especially in smaller ponds.
- Safety glasses and gloves: To protect yourself from injuries during construction.
III. Construction: Building Your Miniature Aquatic World

With your plans and materials ready, it's time to build your tiny pond DIY masterpiece. Follow these steps carefully:
A. Excavation:
- Mark the perimeter: Use string and pegs to outline the desired shape and size of your pond.
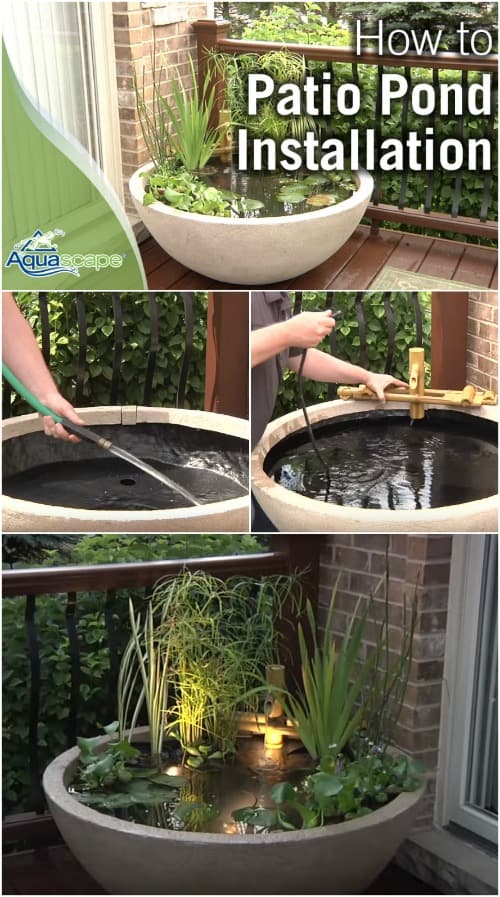
- Dig the hole: Carefully dig the hole, ensuring the depth is sufficient for your chosen plants and any additional features like a pump or filter. A depth of 1-2 feet is usually adequate for a tiny pond. The sides should slope gently to prevent collapse.
- Level the base: Ensure the base of the hole is level to prevent uneven water distribution and liner stress.
B. Liner Installation:
- Prepare the underlayment (optional): If using underlayment, carefully lay it out, ensuring it extends beyond the edges of the excavated hole.
- Place the liner: Carefully unfold the liner into the hole, ensuring it's centered and covers the entire base and sides. Avoid stretching the liner excessively.
- Secure the liner: Use rocks and stones to hold the liner in place, especially along the edges.
C. Landscaping and Finishing Touches:
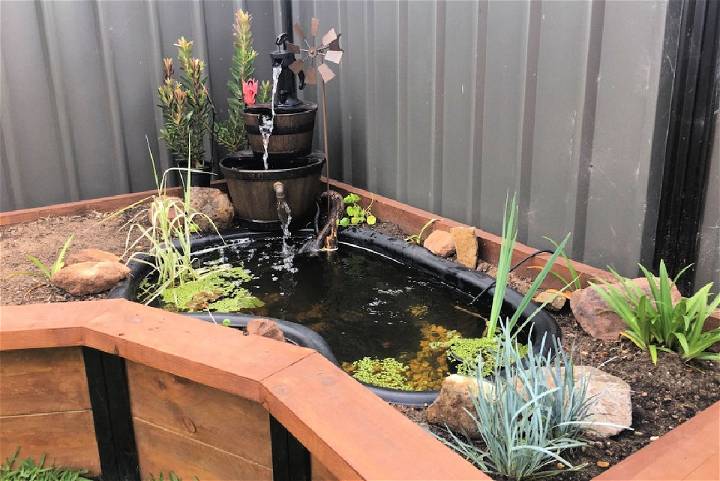
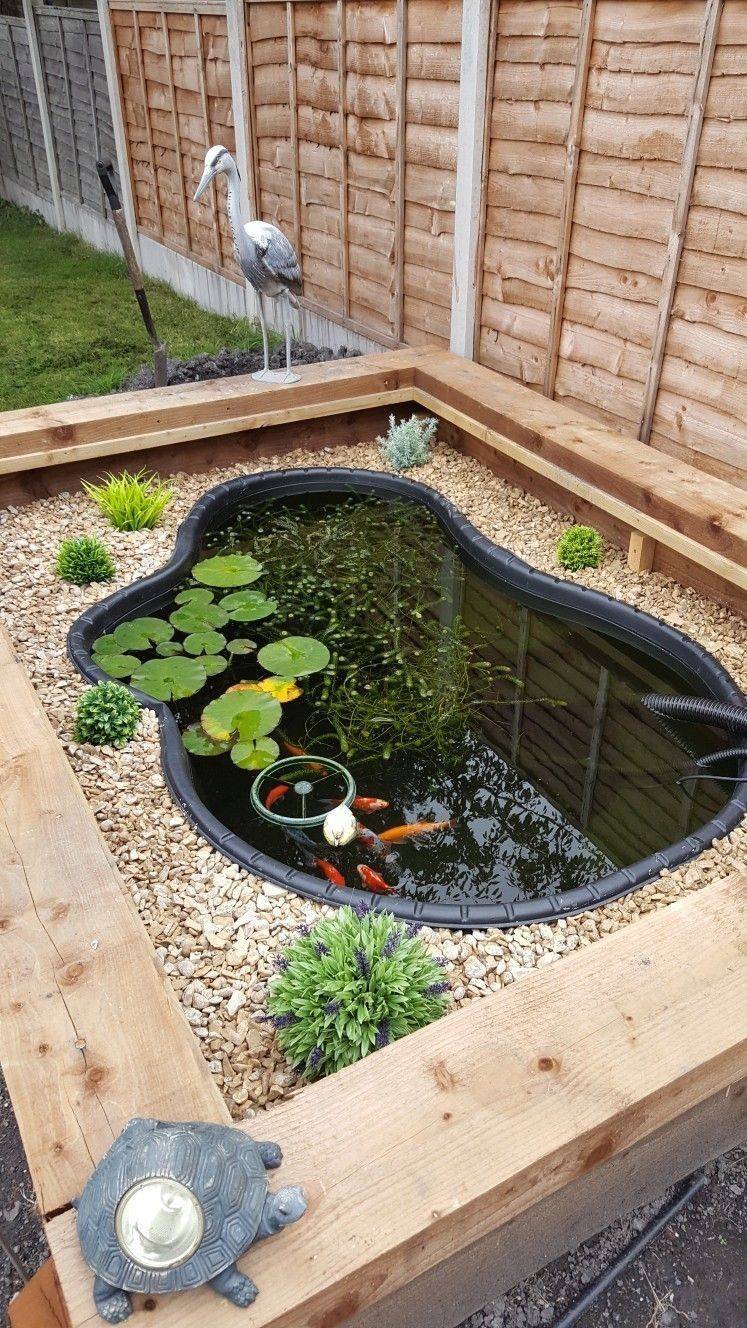
- Add rocks and stones: Create a natural-looking edge around your pond using rocks and stones of varying sizes and colors.
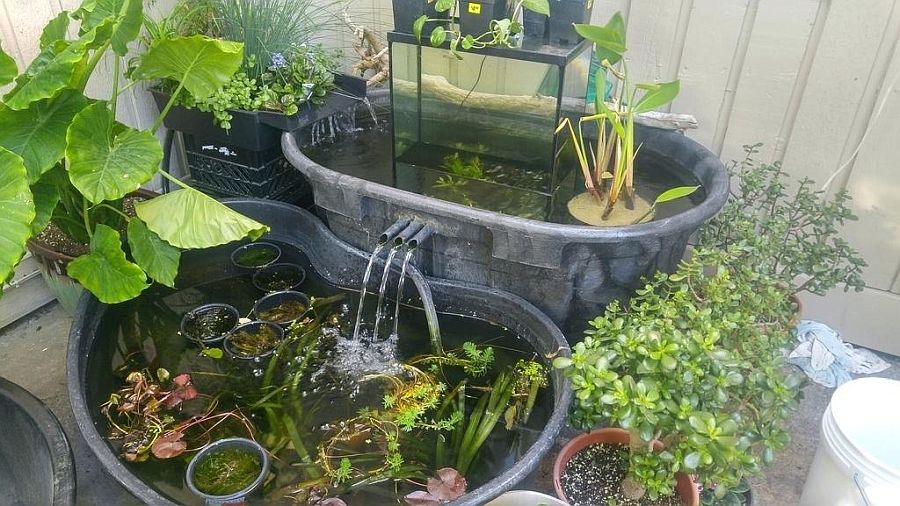
- Plant aquatic plants: Choose plants appropriate for your pond's size and sunlight conditions. These could include oxygenating plants (like hornwort), marginal plants (like irises), and floating plants (like water lilies, depending on size).
- Install a pump and filter (optional): If using a pump and filter, follow the manufacturer's instructions for installation.
IV. Planting Your Miniature Aquatic Paradise
Selecting the right plants is crucial for a thriving tiny pond DIY. Consider these points:

- Oxygenating plants: These plants are essential for maintaining water quality and preventing algae growth. They absorb nutrients and release oxygen into the water. Examples include hornwort, anacharis, and waterweed.
- Marginal plants: These plants grow at the edges of the pond, where their roots are submerged and their foliage emerges above the water. They provide visual interest and habitat for aquatic insects and amphibians. Examples include water irises, pickerelweed, and marsh marigolds.
- Floating plants: These plants float on the surface of the water and provide shade, reducing algae growth. However, they should be used sparingly in small ponds to avoid overcrowding. Examples include water lilies (smaller varieties are best for tiny ponds) and duckweed.
Ensure your chosen plants are appropriate for the size and depth of your pond and the amount of sunlight it receives. Research specific plant requirements before purchasing.
V. Ongoing Maintenance: Keeping Your Tiny Pond Thriving
A tiny pond DIY project requires regular maintenance to ensure its health and beauty. Here's a basic maintenance schedule:
- Water level checks: Regularly check the water level and top it up as needed, especially during dry periods.
- Algae control: Regularly remove any visible algae using a net or pond skimmer. Excessive algae can indicate nutrient imbalances or too much sunlight.
- Plant maintenance: Trim back overgrown plants to maintain a balanced ecosystem and prevent overcrowding. Remove dead or dying plants promptly.
- Cleaning: Remove any debris (leaves, twigs) that falls into the pond to prevent water quality issues.
- Winter preparation (if applicable): In colder climates, take steps to protect your pond from freezing, particularly if you have fish.
VI. Adding Personality: Beyond the Basics
Once your tiny pond DIY is established, you can personalize it with various features to enhance its aesthetic appeal and functionality:
- Rocks and Stones: Experiment with different sizes, shapes, and colors of rocks to create a unique and visually stunning edge to your pond.
- Lighting: Adding subtle lighting, such as solar-powered lights, can dramatically enhance the ambiance of your pond, especially in the evening.
- Small Water Features: A small fountain or waterfall can add movement and visual interest to your tiny pond. Choose a pump appropriately sized for your pond.
- Wildlife Attraction: Create a welcoming environment for beneficial insects and amphibians by planting appropriate vegetation around the pond.
- Artistic Touches: Incorporate small statues, sculptures, or other decorative elements to add a personal touch.
Conclusion: Embrace the Beauty of Small-Scale Water Gardening

A tiny pond DIY project offers a rewarding and achievable way to introduce a touch of natural beauty and tranquility to your backyard. With careful planning, attention to detail, and consistent maintenance, you can create a stunning focal point that will bring joy for years to come. Don't be intimidated by the seemingly complex process; break down the project into manageable steps and enjoy the journey of building your own miniature aquatic haven. The result: a big impact from a small pond!
DIY Tiny Pond Paradise: Budget-Friendly Beauty
Creating a tranquil oasis in your backyard doesn't require a vast expanse of land or a hefty budget. A DIY tiny pond can transform even the smallest space into a captivating haven, teeming with life and brimming with charm. This comprehensive guide will walk you through every step, from planning and design to construction and maintenance, helping you build your own budget-friendly paradise.
I. Planning Your Tiny Pond Paradise: Dream, Design, and Location
Before diving into the construction, careful planning is crucial for a successful and aesthetically pleasing tiny pond. This involves considering several key factors:
A. Defining Your Vision:
What kind of atmosphere are you aiming for? A formal pond with structured lines and precisely placed plants? A more naturalistic pond mimicking a woodland stream? A minimalist pond featuring clean lines and minimal ornamentation? Defining your style will guide your material choices and overall design. Consider incorporating elements that reflect your personal style, such as specific types of water plants, rocks, or even small sculptures.
B. Choosing the Perfect Location:
Sunlight is vital for healthy pond life. Aim for a location that receives at least 6 hours of sunlight per day, but avoid areas with intense afternoon sun, which can overheat the water. Consider the proximity to water sources – easier access to a hose will simplify filling and maintenance. Also, factor in the aesthetics – how will the pond complement your existing landscape?
C. Determining the Size and Shape:
Tiny ponds can range from small containers to larger, more elaborate structures. Consider the available space and your budget when determining the size. Smaller ponds require less material and maintenance, making them ideal for beginners. The shape can be as simple as a round or square container or more elaborate, mimicking natural curves and contours. Think about how the shape will interact with the surrounding landscape.
D. Selecting Materials: Budget-Friendly Choices
Choosing the right materials is key to building a durable and aesthetically pleasing pond. For a budget-friendly approach, explore these options:
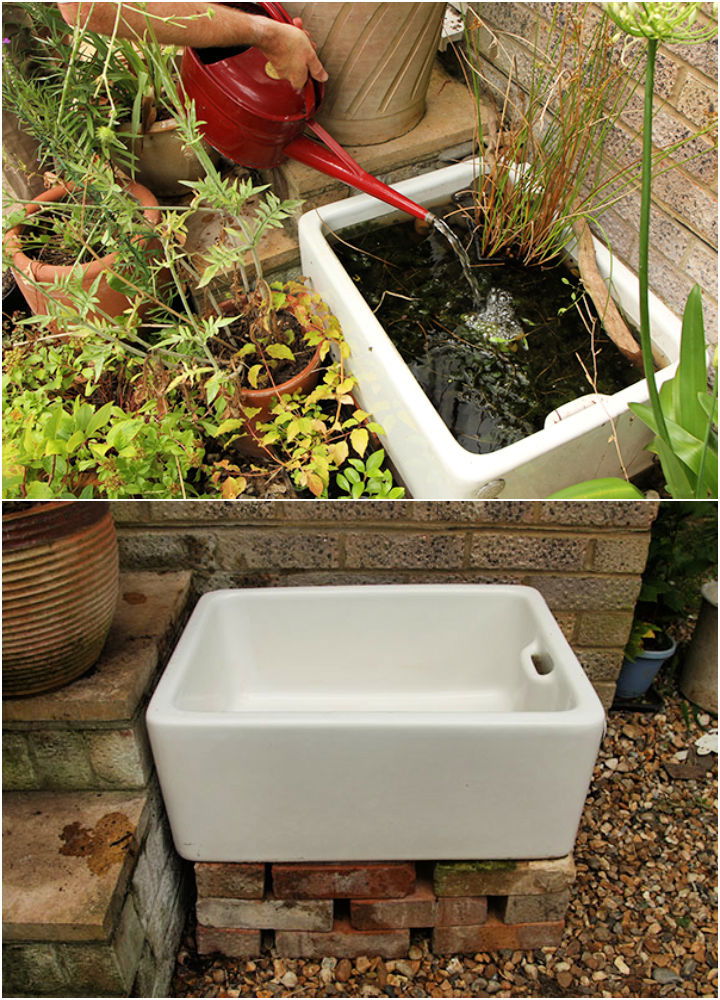
- Containers: Instead of expensive pre-formed pond liners, repurpose large containers like old plastic tubs, galvanized steel troughs, or even large ceramic pots. Ensure the container is watertight and sturdy.
- Liners: If using a container without a liner, consider a heavy-duty pond liner made of EPDM rubber or butyl rubber for superior durability. These are relatively inexpensive for small ponds. Avoid cheap plastic liners, which are prone to tears and leaks.
- Rocks and Stones: Use locally sourced rocks and stones for a natural look, minimizing transportation costs. Visit local landscaping supply yards or even collect suitable rocks from your own property (if permitted).
- Plants: Choose hardy aquatic plants that thrive in your climate and require minimal maintenance. Local nurseries often offer a wider variety and better prices than big-box stores.
II. Building Your DIY Tiny Pond: A Step-by-Step Guide
Once you've completed the planning phase, it's time to build your tiny pond paradise. Here's a step-by-step guide:
A. Preparing the Location:
Clear the chosen location of any grass, weeds, or debris. Level the ground to ensure the container sits evenly. If using a liner, ensure the ground is relatively flat and free of sharp objects that could puncture the liner.
B. Installing the Container/Liner:
If using a pre-formed container, simply place it in the prepared location. If using a liner, carefully unfold it and position it in the prepared area. Ensure there's enough overlap to create a secure seal. Use landscaping fabric or pond underlayment to protect the liner from sharp objects. Fill the container or liner with water to check for leaks.
C. Adding Rocks and Stones:
Arrange rocks and stones around the edges of the pond to create a natural look. Larger rocks can be used to create a border, while smaller stones can be used to fill in gaps and create texture. Avoid placing rocks directly on the liner.
D. Planting Aquatic Plants:
Choose a variety of oxygenating plants, marginal plants, and floating plants to create a balanced ecosystem. Follow the planting instructions provided by your nursery. Planting in pots provides easy access for maintenance and replanting.
E. Adding Water Features (Optional):
Consider adding a small fountain or waterfall to enhance the aesthetic appeal and provide aeration. Small solar-powered pumps are an affordable option.
F. Finishing Touches:
Add any decorative elements you've chosen, ensuring they are aesthetically pleasing and do not obstruct the natural flow of the pond.
III. Maintaining Your Tiny Pond Paradise: Tips for Long-Term Health
Maintaining your tiny pond ensures its longevity and the health of its inhabitants. Here’s how:
A. Regular Water Level Checks:
Evaporation can significantly reduce water levels, especially during warmer months. Regularly top off the pond as needed.
B. Water Quality Monitoring:
Keep an eye on the water clarity. Cloudy water could indicate an imbalance in the ecosystem. Consider using a pond test kit to monitor water parameters like pH and ammonia levels.
C. Plant Maintenance:
Regularly trim back overgrown plants to prevent them from taking over the pond. Remove dead or decaying leaves.
D. Algae Control:
Algae growth is common in ponds. Control it by ensuring adequate sunlight and planting enough oxygenating plants. Avoid using harsh chemicals, which can harm the pond's ecosystem. Consider adding beneficial bacteria to help break down organic matter.
E. Winter Care (if applicable):
In colder climates, take steps to protect your pond during winter. This might involve adding ice melt to prevent the pond from freezing solid or covering it with a protective layer to prevent extreme temperature fluctuations.
IV. Expanding Your Tiny Pond Paradise: Creative Additions
Once you've built your basic pond, you can explore creative additions to enhance its beauty and functionality:
- Lighting: Add solar-powered lights or underwater LED lights to illuminate the pond at night.
- Sculptures: Incorporate small, weather-resistant sculptures to add personality and interest.
- Bridges: A small, rustic bridge can add a charming element to larger ponds.
- Stepping Stones: Create a pathway around the pond using stepping stones for easy access.
- Wildlife Habitats: Encourage beneficial insects and amphibians by adding suitable plants and hiding places.
V. Troubleshooting Common Tiny Pond Problems
Even the best-planned ponds can encounter problems. Here are some solutions to common issues:
- Cloudy Water: This often indicates an overabundance of algae or organic matter. Improve water circulation and consider adding beneficial bacteria.
- Algae Blooms: Reduce nutrient levels by removing excess plant matter and avoid overfeeding fish (if any).
- Leaks: Carefully examine the liner or container for any cracks or holes. Use appropriate sealant to repair any damage.
- Fish Disease: If keeping fish, monitor their health and address any signs of illness promptly.
Creating a DIY tiny pond paradise is a rewarding and fulfilling project. By carefully planning, selecting appropriate materials, and adhering to proper maintenance practices, you can transform a small space into a beautiful, tranquil oasis that will bring joy for years to come. Remember, the beauty of a tiny pond lies not only in its size but also in its charm, individuality, and the personal touch you bring to its creation. So, get started on your own budget-friendly aquatic adventure!


