
Your Bathroom's Secret Weapon: Tile Transformation
Your Bathroom's Secret Weapon: Tile Transformation
Have you ever walked into a bathroom and felt… underwhelmed? Maybe the space feels dated, cramped, or just plain blah. The truth is, sometimes the smallest changes can make the biggest impact. And in the world of bathroom renovations, that secret weapon is often hiding in plain sight: your tiles.
Forget the expensive, gut-wrenching renovations. A tile transformation can breathe new life into your bathroom, boosting its style and value without breaking the bank. This isn't just about slapping on new tiles; it's about understanding the power of design and using tiles to create a space that truly reflects your personal style and enhances your daily routine.
The Power of Tiles: More Than Just a Surface
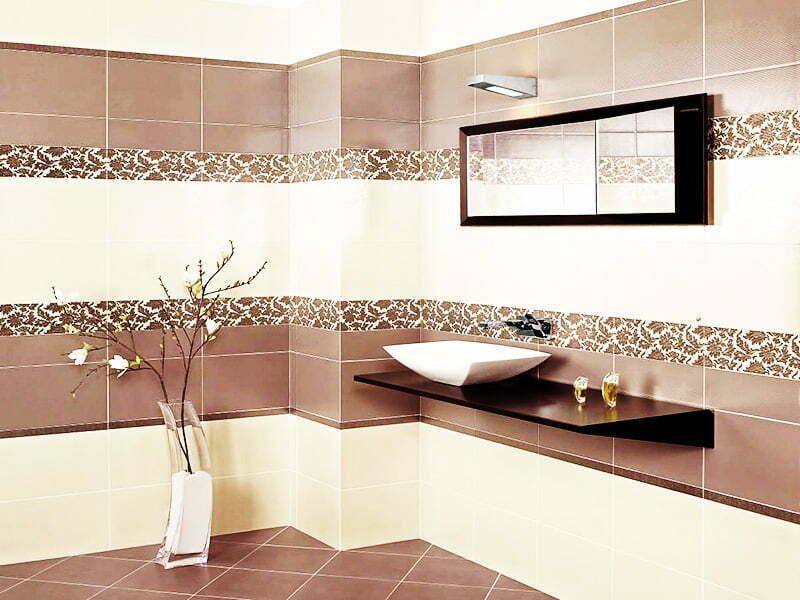
Tiles aren't just functional; they're the backbone of your bathroom's aesthetic. They set the tone, dictate the mood, and can completely transform the feel of the room. Consider these key aspects:
- Color: Light and airy pastels can create a spa-like sanctuary, while bold, dark hues add drama and sophistication.
- Pattern: Geometric patterns bring a modern edge, while intricate mosaics create a luxurious, almost artistic feel.
- Texture: From smooth and polished to rough and textured, the texture of your tiles contributes significantly to the overall tactile experience of your bathroom.
- Material: Ceramic, porcelain, glass, stone – each material offers unique characteristics in terms of durability, maintenance, and aesthetic appeal.
Before You Begin: Planning Your Tile Transformation
Before you rush to the nearest tile showroom, take a moment to plan your transformation. This crucial step will save you time, money, and potential headaches down the line.
1. Assess Your Current Space:
- Take measurements: Accurate measurements are essential for ordering the correct amount of tiles. Consider measuring multiple times to avoid mistakes.
- Evaluate the existing tiles: Are they cracked, damaged, or simply outdated? This will inform your removal and installation process.
- Identify the style you want to achieve: Do you crave a modern minimalist look, a rustic farmhouse charm, or a luxurious spa-like ambiance? Browse Pinterest for inspiration! Create a mood board to visualize your ideal bathroom.
2. Choosing Your Tiles:
- Consider the size and shape: Larger tiles create a more spacious feel, while smaller tiles can add visual interest and texture. Consider the size of your bathroom when making this decision.
- Select a grout color: The grout color can dramatically impact the overall look. A contrasting grout can highlight the tile pattern, while a matching grout creates a seamless, unified look.
- Think about maintenance: Some tiles require more maintenance than others. Consider your lifestyle and choose tiles that suit your cleaning preferences. For example, highly porous stone tiles might require more frequent sealing.
3. Budgeting Your Project:
- Factor in the cost of tiles: Prices vary greatly depending on the material, size, and pattern.
- Account for labor costs: Unless you're a DIY enthusiast with tiling experience, you'll likely need to hire a professional.
- Include the cost of tools and materials: You'll need things like thinset mortar, grout, spacers, and a wet saw (if cutting tiles is needed).
DIY vs. Hiring a Professional: The Great Debate
For many homeowners, this is the big question. Tiling can be a challenging DIY project, requiring precision, patience, and the right tools.
DIY Pros:
- Cost savings: You save on labor costs.
- Personal satisfaction: The pride of completing a project yourself is invaluable.
DIY Cons:
- Time-consuming: Tiling can be a lengthy process.
- Potential for mistakes: Improper installation can lead to cracked tiles, uneven surfaces, and costly repairs.
- Requires specialized tools: Investing in the necessary tools can be expensive.

Hiring a professional Pros:
- Expert workmanship: Professionals ensure a flawless finish.
- Faster completion time: They have the experience and tools to complete the project efficiently.
- Warranty: Many professionals offer warranties on their work.
Hiring a professional Cons:

- Higher cost: Labor costs can add significantly to the overall project budget.
Ultimately, the decision depends on your skills, available time, and budget. If you're unsure, it's always best to consult with a professional.
Step-by-Step Tile Installation Guide (For DIY Enthusiasts):

Caution: This is a simplified guide. Always refer to the manufacturer's instructions for your specific tiles and materials.
1. Preparation is Key:
- Remove existing tiles: Carefully remove the old tiles, ensuring you remove all the old adhesive and grout.
- Clean the surface: Thoroughly clean the wall to remove any dust, debris, or loose mortar.
- Apply a waterproof membrane (if necessary): This is crucial in shower areas to prevent water damage.

2. Applying the Thinset Mortar:
- Mix the mortar according to the manufacturer's instructions: Use a mixing bucket and a drill with a mixing paddle.
- Apply the mortar to the wall using a notched trowel: The notches create grooves to hold the tiles securely.
3. Installing the Tiles:

- Press the tiles firmly into the mortar: Ensure they are level and aligned.
- Use spacers to maintain consistent grout lines: This creates a professional-looking finish.
- Continue tiling the wall, working in sections: Allow the mortar to set slightly before moving on to the next section.
4. Grouting:
- Mix the grout according to the manufacturer's instructions: Ensure it's the right consistency.
- Apply the grout using a rubber grout float: Press it firmly into the grout lines, removing any excess.
- Allow the grout to set: Follow the manufacturer's instructions regarding drying time.

5. Cleaning and Finishing:
- Clean the tiles with a damp sponge: Remove any excess grout immediately before it sets.
- Seal the grout (if necessary): This protects it from stains and moisture.
Remember, patience is key. Take your time, and don't be afraid to ask for help if you're unsure about any step.

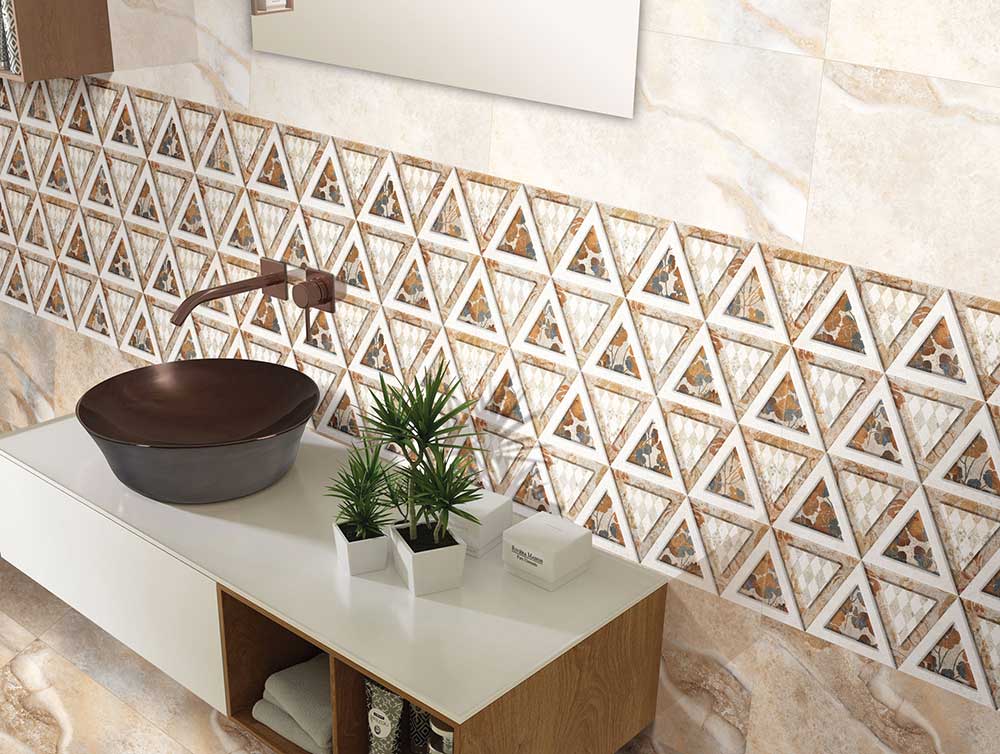
Beyond the Basics: Creative Tile Design Ideas
Let's move beyond simple tile installations and explore some exciting design ideas to truly transform your bathroom:
- Feature Walls: Create a stunning focal point by using uniquely patterned or textured tiles on one wall.
- Accent Strips: Add a thin strip of contrasting tiles to break up large expanses of a single tile type.
- Geometric Patterns: Use tiles in different shapes and sizes to create interesting geometric patterns.
- Mosaic Accents: Incorporate small mosaic tiles to add intricate detail and visual interest.
- Mixing and Matching: Experiment with different tile textures and materials to create a unique and eclectic look.

Inspiring Tile Styles for Your Bathroom Makeover:
- Modern Minimalist: Clean lines, neutral colors, large format tiles, and minimal grout lines.
- Rustic Farmhouse: Warm, earthy tones, textured tiles, and a mix of materials like wood and stone.
- Spa-like Oasis: Light and airy pastels, calming colors, and natural stone tiles.
- Mediterranean Charm: Bold blues, vibrant greens, and intricate mosaic patterns.
- Glamorous Hollywood Regency: Mirror tiles, metallic accents, and luxurious marble.
Remember to always consult with professionals for complex installations or when working with natural stone tiles.
Your bathroom tile transformation is more than just a renovation; it's an opportunity to create a space that reflects your personality and enhances your wellbeing. By carefully planning, selecting the right tiles, and following the proper installation techniques, you can achieve a stunning and functional bathroom that you'll love for years to come. So, unleash your inner designer and get ready to transform your bathroom into the sanctuary you've always dreamed of!


